
Declarative Jenkins Pipelines: Simplifying Continuous Integration and Deployment

Jenkins is a well-known example of Java-based, open-source CI/CD software. It is a great choice for automating the software testing, development, delivery, and deployment processes because it offers both continuous integration (CI) and continuous delivery (CD). Jenkins is flexible and can be used with many different operating systems, such as Windows, Linux, and Ubuntu. An easier and more formal way to define CI/CD pipelines is offered by Declarative Pipelines, a recent addition to Jenkins.
CI and CD are two crucial abbreviations in modern development methodologies and DevOps. Continuous integration (CI) is the process of regularly integrating development work into a main repository where automated builds and tests are carried out. Both the terms "continuous delivery" and "continuous deployment" refer to the continuous delivery of code to an environment.
The CI paradigm, which calls for regular code updates in a shared repository like GitHub, is carried out by developers using Jenkins. Jenkins launches the build process immediately after a developer updates the repository, and any errors are quickly found.
The procedure for installing Jenkins on Ubuntu is simple. The Java Runtime Environment (JRE) is necessary, and OpenJDK can be used to install it. Java must be installed, GPG keys must be imported, the Jenkins repository must be added to the source list, and the system repository must be updated before you can install Jenkins on Ubuntu. The apt install command can be used to complete the installation of Jenkins.
Once Jenkins is installed, it can be set up by opening the server's IP address in a web browser and navigating to port 8080. In the setup process, users can select the plugins they want to install and configure the necessary settings for the Jenkins environment. If you have trouble, go to this blog.
What are Declarative Pipelines in Jenkins?
Declarative pipelines are a new way to define CI/CD pipelines in Jenkins. They provide a simplified syntax that allows developers to define their CI/CD pipelines in a more readable and structured manner. Declarative pipelines are implemented using a Groovy-based domain-specific language (DSL) that provides a higher-level, abstract syntax for defining pipelines. This makes it easier for developers to write pipelines without having to write complex shell scripts.
Advantages of Declarative Pipelines in Jenkins
Simplified Syntax: The syntax of Declarative Pipelines is much simpler and easier to read than the traditional scripted pipelines. This makes it easier for developers to write and maintain CI/CD pipelines.
Improved Error Reporting: Declarative Pipelines provide better error reporting, making it easier to identify and fix errors in pipelines.
Increased Reusability: Declarative Pipelines allow developers to define reusable steps that can be used in multiple pipelines. This helps to reduce code duplication and improves the maintainability of pipelines.
Improved Traceability: Declarative Pipelines provide a clear and concise view of the pipeline stages, making it easier to understand the flow of the pipeline and identify any issues.
How to create Declarative Pipelines in Jenkins
To create a declarative pipeline in Jenkins, you need to follow the steps below:
Login to your Jenkins instance
Go to the Jenkins home page and click on "New Item"
Give a name to your pipeline and select "Pipeline" as the type of job
In the "Pipeline" section, select "Pipeline script" as the pipeline type
In the "Script" section, define your pipeline stages and steps using the Declarative Pipeline syntax. For Practice Copy and paste the following script.
pipeline {
    agent {
        label 'ironman'
    }

    stages {
        stage('Code Checkout') {
            steps {
                git url: 'https://github.com/RishikeshOps/3d-webapp-Kubernetes.git', branch: 'main'
            }
        }
        stage('Image Build') {
            steps {
                sh 'docker build -t rishikeshops/3d-webapp:latest 3d-webapp/.'
            }
        }
        stage('Image Push') {
            steps {
                withCredentials([usernamePassword(credentialsId: 'DockerHub', passwordVariable: 'DockerHubPassword', usernameVariable: 'DockerHubUser')]) {
                    sh "docker login -u ${env.dockerHubUser} -p ${env.dockerHubPassword}"
                    sh 'docker push rishikeshops/3d-webapp:latest'
                }
            }
        }
        stage('Application Deployment') {
            steps {
                sh "docker-compose down && docker-compose up -d"
            }
        }
    }
}
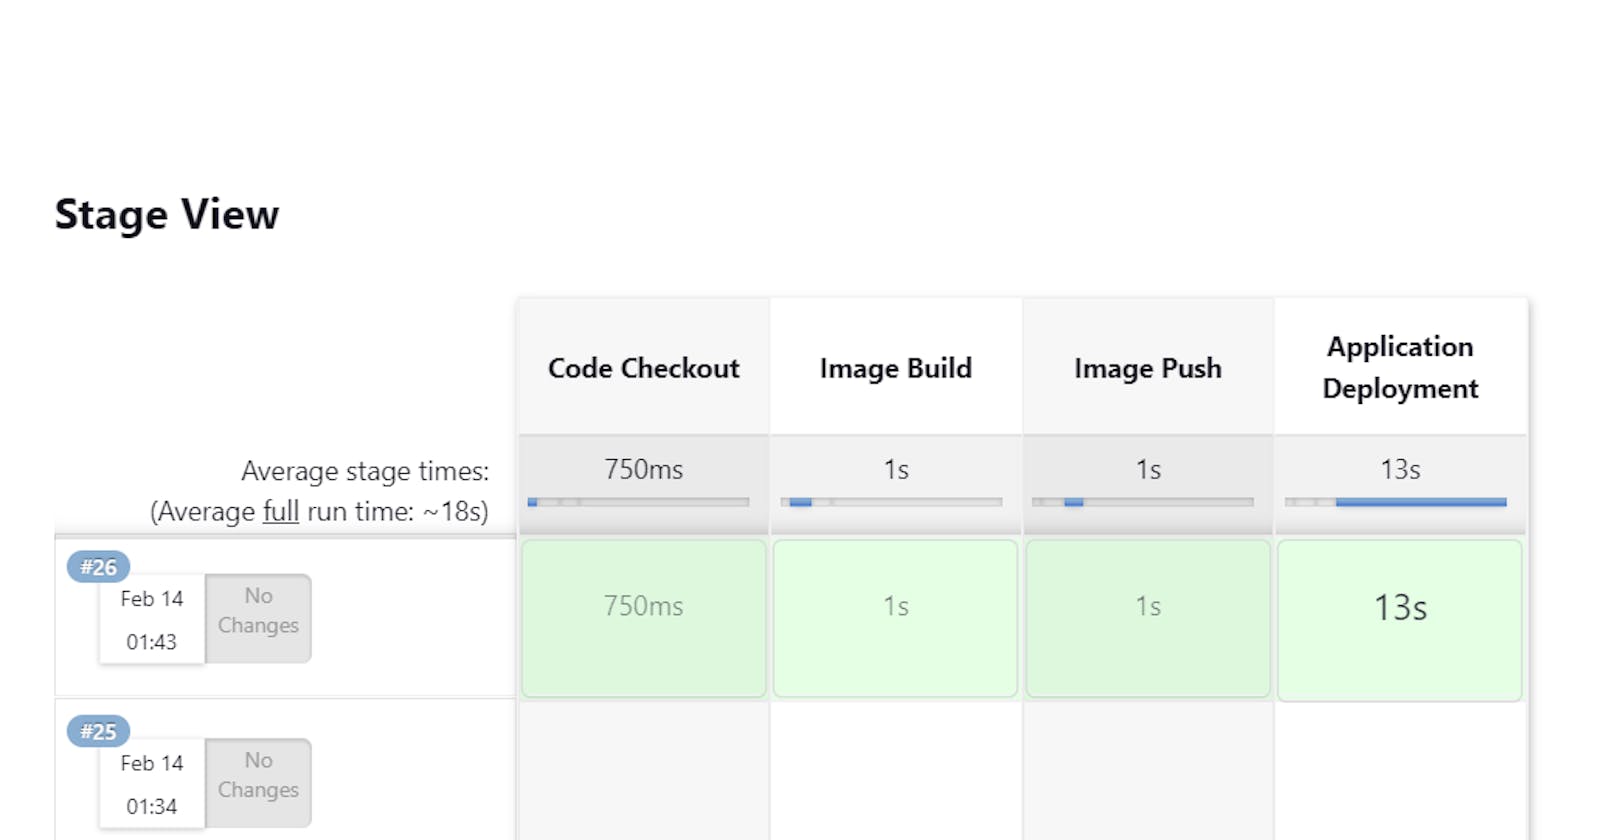
This Jenkins pipeline script automates the continuous integration and continuous deployment (CI/CD) process for a 3D web application. The pipeline is executed by an agent with the label "ironman"
The pipeline consists of four stages:
Code Checkout: In this stage, the code of the 3D web application is retrieved from a GitHub repository using the
gitstep.Image Build: In this stage, a Docker image of the 3D web application is built using a
docker buildcommand.Image Push: In this stage, the built Docker image is pushed to a Docker registry, using a
docker pushcommand. The credentials for the Docker Hub account are retrieved from the Jenkins credentials store.Application Deployment: In this stage, the 3D web application is deployed using
docker-compose. The existing containers are stopped using thedocker-compose downcommand and new containers are started in detached mode using thedocker-compose up -dcommand.
Note :- I assume you connect jenkins agent to master for this project. If not then connect it by doing this steps. And replace agent lable with your agent lable.
To add Docker Hub credentials to Jenkins, you need to follow these steps:
Go to Jenkins dashboard –> credentials –> Global credentials –> add credentials
Select the "Username with password" option from the "Kind" Enter your Docker Hub username and password in the "Username" and "Password" fields
In the "Username" and "Password" fields, enter your Docker Hub username and password.
In the "ID" field, enter a unique identifier for the credentials. For example, you can use "DockerHub".
Click on the "OK" button to save the credentials.
Now you can use these credentials in your Jenkins pipeline script by referencing the "DockerHub" identifier in the "credentialed" parameter of the "usernamePassword" function within a "withCredentials" block.
Example:
withCredentials([usernamePassword(credentialsId: 'DockerHub', passwordVariable: 'DockerHubPassword', usernameVariable: 'DockerHubUser')]) {
    sh "docker login -u ${env.dockerHubUser} -p ${env.dockerHubPassword}"
    sh 'docker push rishikeshops/todo-app:latest'
}
Note: You can use GitHub webhook integration with this; this is a demo static project with only the front-end for practice; you can deploy and share other projects in the same way. Don't forget to tag me if this blog helps you. 🙌🙌
Conclusion
In conclusion, Declarative Pipelines in Jenkins provide a simplified and more structured way to define CI/CD pipelines. They offer several benefits over traditional scripted pipelines, including a simplified syntax, improved error reporting, increased reusability, and improved traceability.
Whether you are new to CI/CD or an experienced DevOps professional, declarative pipelines in Jenkins offer a powerful and flexible solution for automating your software development processes. With its easy-to-use syntax and comprehensive feature set, Jenkins can help you streamline your software delivery pipeline and take your development processes to the next level.
Thanks for reading to the end; I hope you gained some knowledge.❤️🙌
- Rushikesh Mashidkar💕