


Dockerfile, Docker-Compose, Swarm and Volumes
A Comprehensive Guide to Building, Orchestrating and Sharing Data in Containers


If You Want to dive into the world of containerization and explore the basics of what containers are and how they are used. We also take a closer look at Docker and its many uses, including Docker Desktop and the advantages and disadvantages of using this powerful tool. To supplement your understanding, we have also included the Ultimate Docker Cheat Sheet, which serves as a quick reference guide for all your containerization needs. For more in-depth information on the topic, be sure to check out my previous blog post here.
Dockerfile
Docker is a tool that makes it easy to run applications in containers. Containers are like small packages that hold everything an application needs to run. To create these containers, developers use something called a Dockerfile.
A Dockerfile is like a set of instructions for making a container. It tells Docker what base image to use, what commands to run, and what files to include. For example, if you were making a container for a website, the Dockerfile might tell Docker to use an official web server image, copy the files for your website into the container, and start the web server when the container starts.
Here are some of the most commonly used commands in a Dockerfile:
FROM: Specifies the base image that the new image will be built on top of. For example, you might use an official Node.js image as the base for an application that runs on Node.js.RUN: Executes a command in the image. This command is run during the image build process. For example, you might use theRUNcommand to install necessary packages or dependencies for your application.COPY: Copies files from the host machine to the image. For example, you might use theCOPYcommand to copy the files for your application into the image.ENV: Sets an environment variable in the image. For example, you might use theENVcommand to set a variable that holds the version of your application.EXPOSE: Specifies the ports that should be exposed on the container. For example, you might use theEXPOSEcommand to specify that port 8000 should be exposed on the container.CMD: Specifies the command that should be run when a container is created from the image. For example, you might use theCMDcommand to specify that your application should be started when the container is created.Examples
Once the image is created from the Dockerfile, you can use it to create as many containers as you want. Each container will be exactly the same and will run the same way.
Docker-Compose
Docker Compose is a tool that makes it easy to run multiple containers at once. It allows you to define all the containers, networks, and volumes for your application in a single file. This file is called a "docker-compose.yml" file.
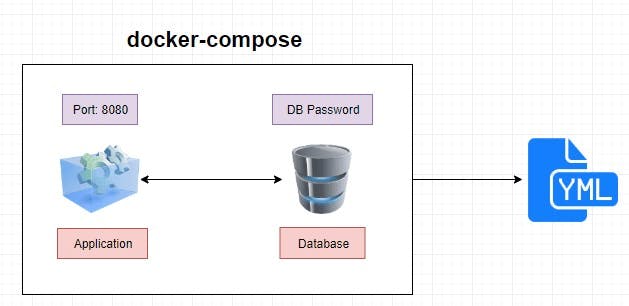
Imagine you have a web application that consists of a web server, a database, and a cache. Each of these parts is run in its own container. To run all these containers individually, you would have to run several commands, and it would be hard to keep track of them all. With Docker Compose, you can define all the containers and their configurations in a single file.
The docker-compose.yml file is like a recipe for your application. It tells Docker Compose which images to use, which ports to expose, and how to link the containers together. It's similar to a recipe you would use to cook a meal. You have a list of ingredients, and instructions on how to prepare and serve them.
To start these services, you would use the command docker-compose up, and to stop them, you would use the command docker-compose down.
Docker Compose is a powerful tool that makes it easy to run multiple containers at once, and it allows you to define all the containers, networks, and volumes for your application in a single file. With this tool, you can describe your entire application in a single file, making it easy to manage and deploy your application.
In simple words, Docker Compose is a tool that makes it simple to run multiple containers together, by using one file to describe all the containers that make up an application. It's like a set of instructions that tell Docker how to run your application, similar to a recipe that tells you how to cook a meal.
Benefits of Docker Compose
● Single host deployment - This means you can run everything on a single piece of hardware
● Quick and easy configuration - Due to YAML scripts
● High productivity - Docker Compose reduces the time it takes to perform tasks
● Security - All the containers are isolated from each other, reducing the threat landscape
Docker-Volume
Docker also allows you to create something called volumes. Volumes are like separate storage areas that can be accessed by containers. They allow you to store data, like a database, outside the container, so it doesn't get deleted when the container is deleted.
When we run a container, it has its own storage space that is only accessible by that specific container. If we want to share that storage space with other containers, we can't do that.
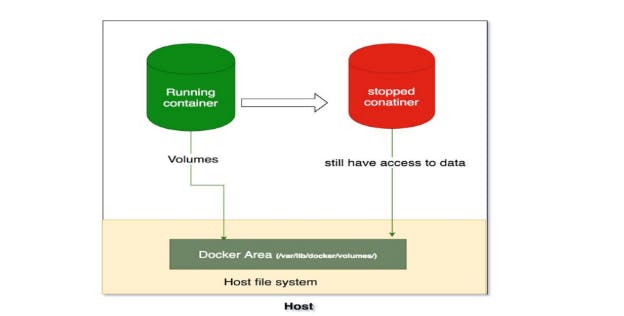
Docker Volumes are a solution to this problem. Volumes are like extra storage spaces that can be used by multiple containers at the same time. They are stored separately from the containers and can survive even if the container is stopped. This means that even if a container is shut down, the data stored in the volume can still be accessed by other containers.
Think of it like having a shared drive on your computer where multiple people can access the same files. The shared drive is separate from each person's individual storage space and the files stored there can be accessed even if one of the users logs off.
In short, Docker Volumes is a way to share storage between different containers, making it easy to share data and store persistent information that needs to survive even if the container is stopped.
To create a volume, you use the docker volume create a command followed by the name of the volume. For example, to create a volume named app_1_volume, you would use this command:
docker volume create app_1_volume
To connect a container to a volume, you use the -v flag when running the container. For example, to connect a container named mycontainer to the data volume, you would use this command:
docker run -v data:/data -it --name mycontainer myimage
This connects the data volume to the /data directory in the container, allowing the container to access the data stored in the volume.
In simple terms, a Dockerfile is a set of instructions for making a container, and volumes are like separate storage areas that can be accessed by containers. Developers use Dockerfiles to create images, and use those images to create containers that run applications. Volumes are used to store data outside the container, so it doesn't get deleted when the container is deleted.
Docker Swarm
Docker Swarm is a tool that allows you to easily manage and organize multiple containers, which are small packages that hold all the necessary files for a specific application to run. The way it works is by dividing the management of the containers into two parts: manager nodes and worker nodes.
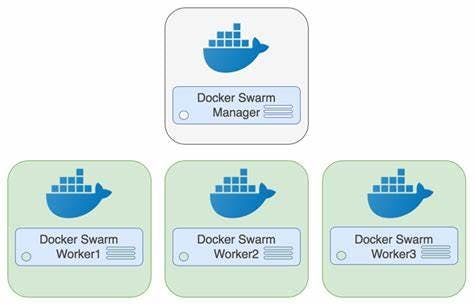
Manager nodes are responsible for making sure everything runs smoothly and that the desired state of the containers is achieved. They do this by using a special algorithm that allows them to communicate with each other and make sure that everything is running as it should.
Worker nodes, on the other hand, are responsible for actually running the containers. They communicate with the manager nodes to receive instructions on what to do and report back on the status of the containers.
Think of it like a construction project. The manager nodes would be the project managers, who make sure everything runs smoothly and is on schedule and budget. While the worker nodes would be the construction workers, who do the actual work of building the structure.
In simple terms, Docker Swarm is a tool that allows you to easily manage and organize multiple containers by dividing the management into two parts, manager nodes and worker nodes, where manager nodes make sure everything runs smoothly and worker nodes run the containers.
To start using Docker Swarm, you first create a "Swarm" which is like a group of connected computers (or "nodes") that work together. Then, you can add more computers to this group as needed. Once your Swarm is set up, you can then create "services" which are like individual applications that run inside containers.
For example, let's say you have a website that displays a list of products. To run this website, you would create a service that runs an nginx container (a type of container that helps display web pages) and maps port 80 (the default port for web pages) on the host to port 80 in the container.
docker service create --name my-web --replicas 3 --network mynetwork -p 80:80 nginx
This command creates a service named my-web, with 3 copies running on the mynetwork network and mapping port 80 on the host to port 80 in the container.
You can also use the docker service ls command to view the services running on the Swarm and the docker service scale command to increase or decrease the number of copies of a service. For example, if you wanted to increase the number of copies for the my-web service to 5, you would use the following command:
docker service scale my-web=5
Docker Swarm also allows for rolling updates of services. This means that you can update the image or configuration of a service without any down-time. You can use the docker service update command to perform a rolling update on a service.
In simple terms, Docker Swarm allows you to easily manage and organize multiple applications running in containers, and handle changes or updates without any down-time. It's like hiring a manager for your group of connected computers, so you can focus on running your applications.
The advantages of Docker Swarm Architecture are:
Easily manageable by using the swarm command
Only one point of access is needed to build a whole swarm
Simple and easy to understand compared to other orchestration tools like Kubernetes
High availability, so if the master fails, another worker node takes over
The manager keeps track of the cluster's state to maintain consistency between the actual and desired state.
It's a versatile tool that can be used for various tasks and is easy to set up and manage.
Docker Network
Docker allows you to create virtual spaces called networks, where you can connect multiple containers (small packages that hold all the necessary files for a specific application to run) together. This way, the containers can communicate with each other and with the host machine (the computer on which the Docker is installed).
There are three types of networks that can be created in Docker:
Bridge network: This is the default network that is created when Docker is installed. Containers connected to a bridge network can talk to each other and to the host machine, but not to other networks. To create a new bridge network, you can use the
docker network createcommand. For example, to create a new bridge network namedCustomNetwork, you would use the following command:docker network create --driver bridge CustomNetworkHost network: Containers connected to a host network have direct access to the host machine's network interfaces and ports. This type of network is useful for situations where a container needs to bind to a specific port on the host machine. To create a new host network, you can use the
docker network createcommand with the--driver hostoption. For example, to create a new host network namedCustomNetwork, you would use the following command:docker network create --driver host CustomNetworkOverlay network: Overlay networks allow you to create multi-host networks, which means that containers can communicate across multiple host machines. This type of network is useful for situations where a container needs to communicate with other containers that are running on different host machines. To create a new overlay network, you can use the
docker network createcommand with the--driver overlayoption. For example, to create a new overlay network namedCustomNetwork, you would use the following command:docker network create --driver overlay CustomNetwork
To create a new network, you can use the docker network create command. For example, to create a new network named mynetwork you would use the following command:
docker network create mynetwork
Once the network is created, you can use the docker network connect command to connect a container to the network. For example, to connect a container named mycontainer to the mynetwork network, you would use the following command:
docker network connect mynetwork mycontainer
In simple terms, Docker networks allow you to connect multiple containers together and make them communicate with each other and the host machine. There are different types of networks that can be created depending on the needs, and you can use the docker network create and docker network connect commands to create and connect containers to the network respectively.
conclusion
In conclusion, Docker Swarm is a simple and easy-to-use orchestration tool that can handle a variety of tasks. It is suitable for small to medium-sized deployments, and is easy to set up and manage. However, if you are looking for a more feature-rich and complex solution with more scalability options, then Kubernetes might be a better fit. Ultimately, the choice between the two depends on the specific needs and requirements of your project and organization.
Thanks For Reading! :)
- Rushikesh Mashidkar💕